Video Analytics is a smart video security feature that helps you distinguish important events from routine activity. It uses real-time data to filter and categorize your video alerts, giving you more control over your video monitoring and customization.
To get started, you need to set up your “rules” or preferences for Video Analytics on the website you use to control your security system:
1. Log into MyGuardianHome.com.
2. Select Video > Recording Rules > Add Rule.
3. In the New Video Recording Rule window, select “Video Objection Detection.”
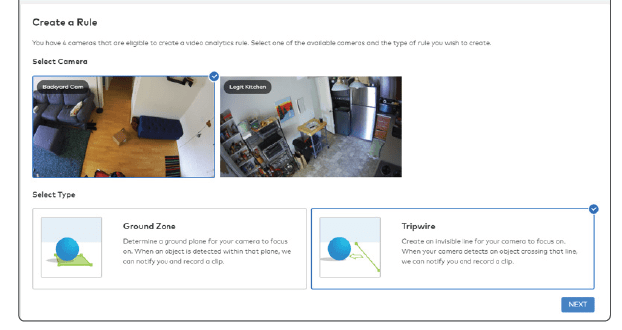
4. Select the desired camera.
5. Choose the rule type (Tripwire or Ground Zone).
- Use a Tripwire rule when you expect a target to cross through the camera’s field of view or when objects enter or exit an area (e.g., a car pulling into or backing out of a driveway).
- Use a Ground Zone rule when you expect a target to loiter in the camera’s field of view (e.g., a person delivering a package on your front porch).

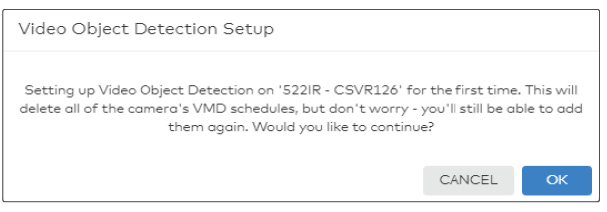
All Video Motion Detection (VMD) schedules associated with a camera must be deleted before setting up a Video Object Detection rule. When prompted with this warning, select “OK” to continue.

Camera Scene Setup
1. Set the scene to “indoors” or “outdoors” based on what the camera is pointing at.
2. The Minimum Object Detection Size slider determines the minimum size of objects detected by the rule. Setting it to “Very Large” will give you fewer triggers and ignore smaller objects.

How to Create Ground Zones
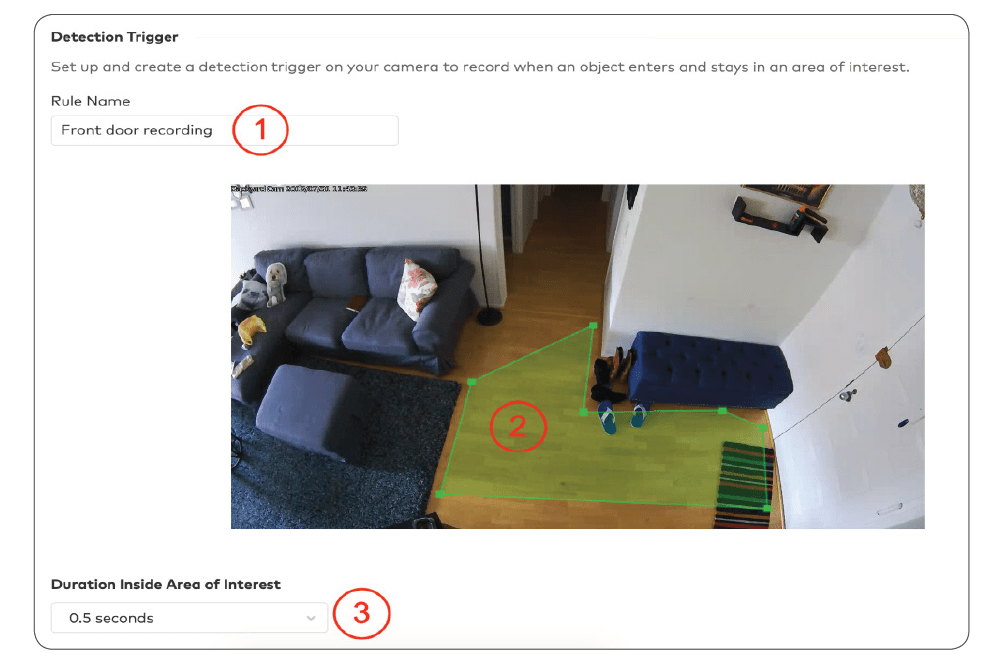
1. Name the rule to help you remember it later (e.g., “Front Door Recording”).
2. Select the area of interest by drawing a shape covering the ground where the object may linger.
3. Double-click inside the camera’s field of view to draw a new shape from scratch.
4. Click and hold inside the shape to move it around.
5. Hold right-click to rotate the shape.
6. Customize how long something must be inside the drawn shape before notifying you and recording a clip.

How to Create Tripwires

1. Name the rule to help you remember it later (e.g., “Hallway Crossing”).
2. Draw a line covering only the ground where the target’s feet will cross.
3. Select which direction to monitor the flow of traffic or choose to monitor in both directions.
How to Enable Light Automation
The “Light Automation” section will appear toward the bottom of the Video Object Detection Rule page.
1. Using the “Turn on selected lights for” dropdown menu, select how long the lights should turn on.
2. Select which lights the rule should apply to.
3. Specify what kind of event (person, animal or car) should trigger the light to turn on.
4. Select a time frame for the rule to occur.
Customize Your Rule Schedules and Notifications
1. Select whether a rule should always be active or only during specific days/times, along with any exceptions to the rule. (Remember: Your lights won’t turn on during a time you’ve set to not record.)
2. Set the minimum time delay between clips.
3. Pick the types of objects that would need to appear in a clip for you get a notification (person, animal or vehicle).
4. Choose how you want to receive notifications. We recommend getting push notifications to your phone using the dropdown option to attach a thumbnail.

Viewing Your Video Clips
You can view your video clips by logging into MyGuardianHome.com or the app.
On the website, just choose “Video” and “Saved Video Clips,” and any clips with a person, vehicle or animal classification appear here by default.
If you are on the app, select the menu icon (the three horizontally stacked lines) after logging in. Select “Video” and then “Saved.”
To see clips only with a specific classification, or clips without a standard classification, change the selection in the Filters dropdown menu.

